Quantcast
Channel: Lowyat.NET: Latest topics in Reviews and Guides
Viewing all 559 articles
Browse latest View live

2TB Transcend StoreJet 25M3C, Solid rugged portable hard drive!

$
0
0
Author's Note: The original review can be found at my blog - Transcend StoreJet 25M3C Review @ JayceOoi.com.

Introduction
Up to 5Gbps lightning-fast transfer speeds with USB 3.1 Gen 1 interface, excellent three-stage anti-shock protection that meets US military drop-test standards, one touch auto backup, USB Type-C port... Yes, that's all part of 2TB Transcend StoreJet 25M3C ruggedized portable hard drive's features. And comes with 3 years warranty too. Great for file storage? Let's find out...

Special Thanks
This review is possible thanks to below companies. Be sure to check them out too...
  • Transcend for this 2TB Transcend StoreJet 25M3C Portable Hard Drive

user posted image

Package Content & Design
Everything comes well-protected. Once taken out StoreJet 25M3C, you can find 2 cables - USB Type C to USB Type A & USB Type C to USB Type C, quick start guide and Transcend product brochures in the package.

user posted image

Build quality is outstanding thanks to durable anti-shock silicone rubber outer case, internal shock-absorbing suspension damper and reinforced hard casing. Three-stage shock protection system that meets U.S. military drop-test standards MIL-STD-810G 516.6.

user posted image

There is only one colour to choose - iron gray.

user posted image

Yes, that’s the One Touch Auto-Backup button (with blue LED light indicator) and USB-C port. Note – Transcend Elite data management software is required in order for that function to work.

user posted image

You can remove the outer rubber case to clean it as you wish.

user posted image

Software
Transcend Elite is advanced data management software that keeps important files organized, protected, and up-to-date for your StoreJet 25M3C. Compatible with macOS, Windows OS and Android. Perform instant backups and scheduled backups. Restore from any point on the backup task list. Protect files with powerful 256-bit AES encryption. You can also back up files from Google Drive or Dropbox to your StoreJet 25M3C.

user posted image

Another useful software - RecoveRx. It is a free data recovery utility that allows you to search deep within a storage device for traces of erased files including digital photos, documents, music and videos. With just a few mouse clicks, you can easily recover virtually any type of digital file. A great tool when you need it.

user posted image

70mai TPMS Lite,

$
0
0
Author's Note: The original review is found at jwtech, please head to the site to show us your support as well. Click here to view all my product reviews.

[attachmentid=10379721]

Got the 70Mai Tyre Pressure Monitor System Lite for review.

Note – The Lite version is using the external sensors whereas the normal version is using built-in sensors.

Aliexpress product page: 70Mai TPMS


Technical Specs:
• Model: Midrive T02
• Receiver working voltage: 5V
• Receiver current: 1A
• Receiver working temperature: -20° to 70° C
• Receiver power supply: Solar/USB cable
• Receiver battery capacity: 500mAh
• Receiver Bluetooth 4.2
• Sensor air pressure range: 0.0 to 8.0 Bar (0 to 100 psi)
• Sensor working temperature: -40° to 80° C
• Sensor air pressure accuracy: ±0.1 bar
• Sensor temperature accuracy: ±3°C
• Sensor operating frequency: 433.92MHz
• Sensor transmit power: <8 dBm
• Sensor waterproof rating: IP67
• Sensor weight: 9g


The box
[attachmentid=10379722] [attachmentid=10379723]
[attachmentid=10379724] [attachmentid=10379725]
[attachmentid=10379726] [attachmentid=10379727]


Open box
[attachmentid=10379728] [attachmentid=10379729]
[attachmentid=10379730]


Contents
[attachmentid=10379732]
• Receiver
• External sensors x4
• Battery removal clamps
• Anti-theft HEX nuts
• Metal wrench
• Micro USB cable
• Tyre pressure warning stickers
• Spare waterproof rubber rings
• User manual


Receiver
[attachmentid=10379733] [attachmentid=10379734]
[attachmentid=10379735] [attachmentid=10379736]
[attachmentid=10379737] [attachmentid=10379738]


External sensors
[attachmentid=10379739] [attachmentid=10379740]
[attachmentid=10379741] [attachmentid=10379742]
[attachmentid=10379743]
External sensors using CR1632 lithium batteries.


Battery removal clamps
[attachmentid=10379744] [attachmentid=10379745]
[attachmentid=10379750] [attachmentid=10379757]


Anti-theft HEX nuts
[attachmentid=10379758]


Metal wrench
[attachmentid=10379759] [attachmentid=10379760]


Micro USB cable
[attachmentid=10379761] [attachmentid=10379762]


Tyre pressure warning stickers
[attachmentid=10379763]


Spare waterproof rubber rings
[attachmentid=10379768]
Replacement waterproof rubber rings in the external sensors


User manual
[attachmentid=10379775] [attachmentid=10379776]
[attachmentid=10379778] [attachmentid=10379779]
[attachmentid=10379782] [attachmentid=10379790]


Test setup
[attachmentid=10379792] [attachmentid=10379793]


70mai app
[attachmentid=10379795] [attachmentid=10379800]
[attachmentid=10379805] [attachmentid=10379809]
[attachmentid=10379812] [attachmentid=10379815]
[attachmentid=10379819] [attachmentid=10379820]
[attachmentid=10379821] [attachmentid=10379822]
[attachmentid=10379823] [attachmentid=10379824]


Low pressure test
[attachmentid=10379826] [attachmentid=10379827]
The receiver will continuously beep and flash when low pressure is detected.


Final thoughts
The 70mai TPMS Lite is very nicely built. Each sensor has laser-etched markings with QR code for longer durability.

The only drawback that the pressure is measured in Bar only. I wish there is a setting to can change to use Pounds per Square Inch (Psi) also.

Luckily here we are also using Kilopascal (kPa). Conversion from Bar to kPa is 1.1 bar is 110 kPa.

How to migrate or update DIR-868L router firmware, Custom DD-WRT and Tomato firmwares

$
0
0
Introduction

This guide was developed from various online resources and personal experience on D-Link DIR-868L router. biggrin.gif Credits are due to all contributions. thumbup.gif
I made this to share with others and facilitate their efforts. I know how difficult this can be. rclxub.gif
The units were purchased for Malaysian/Singapore market in November 2019. So it’s a recent model with HW A1 and FW 1.22SHC.
I managed to migrated all of them to DD-WRT and Tomato/Advanced Tomato. Also, I am able to migrated back to D-Link factory firmware FW-1.22SHC.

Altogether, there are three to four steps that you need to follow in order to migrate your DIR-868L to custom firmware like DD-WRT or Tomato with minimal problems.

Step 1: Downgrade DIR-868L factory firmware to FW1.00SHC

• Bear in mind that it is not recommended to install third-party firmware such as DD-WRT or Tomato though D-Link normal firmware upgrade. You will encounter all kind of problems. Something that you really want to avoid.
• You need to perform migration at Recovery Mode. Please refer to the steps at Recovery Mode, last section of this guide.
• First, you need to downgrade from your existing firmware (e.g. FW1.22SHC) to FW1.00SHC. This is important for successful migration to DD-WRT or Tomato firmware.
• Download FW1.00SHC firmware from D-Link Singapore website https://www.dlink.com.sg/dir-868l/#firmware.
• Unplug all cables (incl. power cable) from the router.
• Connect the router to the PC using one of the 4 switch ports. Please do not plug to the WAN port (yellow colour).
• Set computer IP address to 192.168.0.2 and use 255.255.255.0 as the Subnet mask.
• Power-on the router while pushing a paperclip to the hidden reset button located at the bottom of the device for a few seconds.
• When the Power LED starts blinking, release the reset button.
• Use Mozilla FireFox browser and navigate to http://192.168.0.1. Other browsers will give you problems.
• You will see a text-based firmware update page where you can select the firmware file you want to upload.
• Upload the FW1.00SHC firmware, when completed the router should report to reboot.
• The router should now be running FW1.00SHC firmware and accessible on the default address. (http://192.168.0.1). Default user is admin and no password i.e. blank
• The router is ready to be migrated to DD-WRT firmware.
• It is important to note that it is necessary to migrate the router to DD-WRT before you migrate to Tomato firmware.

Step 2A: Migrate to DD-WRT firmware

• First, you need to download DD-WRT firmware.
• DD-WRT version r25974 was used with great success repeatedly on three separate units.
• Download the r25974 files here. ftp://ftp.dd-wrt.com/betas/2015/01-20-2015-r25974/
• Download two files factory-to-ddwrt.bin and dir868a-webflash.bin.
• First, flash the factory-to-ddwrt.bin file using the D-Link router’s firmware upgrade page.
• The process will take up a few minutes. Once successfully flashed, the router will reboot.
• Next, go to the router page (default is 192.168.1.1)
• Using the D-Link router’s firmware upgrade page, flash second file, dir868-webflash.bin.
• The router will reboot once again.
• You should see DD-WRT and will be asked to enter new user and new password.
• I suggest admin and admin, respectively. You can change them when you complete the whole migration process.
• At this point you have a choice to upgrade to newer DD-WRT firmware version (Step 2B) or upgrade to Tomato firmware (Step 2C).
• The following link may help you to decide to choose between DD-WRT or Tomato firmware. https://techstorify.com/dd-wrt-vs-tomato-vs...outer-firmware/

Step 2B: Upgrade to newer DD-WRT firmware

• Download the latest DD-WRT firmware ftp://ftp.dd-wrt.com/betas/
• Choose 2019 folder.
• Latest is r41686 ftp://ftp.dd-wrt.com/betas/2019/12-10-201...k-dir868l-reva/
• Download the dir868a-webflash.bin file.
• Go to Administration -> Firmware Upgrade and browse to select the file.
• Then flash the dir868a-webflash.bin file with Reset to Default Settings.
• As usual the process will take a few minutes.
• Once complete, the new DD-WRT firmware should boot up.
• Right after this, go to Administration -> Configuration ->Restore Default Configuration and choose Erase all data in NVRAM memory (thorough) option.
• Click OK button.
• This will take a few more minutes. Once done, you are all set!

Step 2C: Migrate to Tomato firmware

• Download the latest Tomato by Shibby firmware.
• Latest is version is 140. http://tomato.groov.pl/download/K26ARM/140-MultiWAN/
• Unzip the file.
• Go to Administration -> Firmware Upgrade and browse to select the file.
• Then flash the tomato-DIR868L-ARM--140-special.trx file with Reset to Default Settings.
• As usual the process will take a few minutes.
• Once complete, the new Tomato firmware should boot up.
• Right after this, go to Administration -> Configuration ->Restore Default Configuration and choose Erase all data in NVRAM memory (thorough) option.
• Click OK button.
• This will take a few more minutes. Once done, you are all set!

Step 2D: Optional upgrade to Advanced Tomato firmware

• This is an optional step.
• Advanced Tomato present a more pleasant GUI that some of us would appreciate.
• Download the latest Advanced Tomato firmware.
• Latest is version is 3.5-140. https://advancedtomato.com/downloads/router/dir868l
• Unzip the file.
• Go to Administration -> Firmware Upgrade and browse to select the file.
• Then flash the tomato-DIR868L-AT-ARM-3.5-140-special.trx file with Reset to Default Settings.
• As usual the process will take a few minutes.
• Once complete, the new Tomato firmware should boot up.
• Right after this, go to Administration -> Configuration ->Restore Default Configuration and choose Erase all data in NVRAM memory (thorough) option.
• Click OK button.
• This will take a few more minutes. Once done, you are all set!

Recovery Mode:

D-Link DIR-868L provides an easy way to recover using Recovery Mode (Also a useful and a recommended way to install third-party firmware)
• When the Power LED keeps blinking on boot, the router has entered the recovery mode.
• This usually happens when flashing a firmware went wrong, or the configuration has been corrupted.
• It is also possible to (force) boot into recovery mode to restore a soft-bricked router or flashing back to the factory firmware.
• Download the latest available firmware on the official D-Link website of the router revision. https://www.dlink.com.sg/dir-868l/#firmware
• Unplug all cables (incl. power cable) from the router
• Connect the router to the PC using one of the 4 LAN ports. Please do not plug to the WAN port (yellow colour).
• Set the PC TCP/IPv4 address to 192.168.0.2 and use 255.255.255.0 as the Subnet mask
• Power-on the router while pushing a paperclip to the hidden reset button located at the bottom of the device for a few seconds.
• When the Power LED starts blinking, release the reset button
• Use Mozilla FireFox browser and navigate to http://192.168.0.1. Other browser will give you problems.
• Upload the D-Link firmware, when completed the router should reboot.
• The router should now be running factory D-Link firmware and accessible on the default address. (http://192.168.0.1).
• Please note that if you encounter problems going back to the latest factory D-Link firmware, it is suggested to start with an early firmware e.g. FW1.03 and work your way up until the latest.
• Each time you need to reset to factory defaults to clear the NVRAM memory of the router, before you upgrade to a newer firmware.
• The last step seems to be necessary when you are upgrading from FW110 to FW122, if you encounter a warning that size of the firmware is too big.

Ugreen True Wireless Stereo CM338, New TWS Challenger...

$
0
0
Author's Note: The original review is found at jwtech, please head to the site to show us your support as well. Click here to view all my product reviews.

[attachmentid=10379882]

Thank you Ugreen for sending over their True Wireless Stereo CM338 for review.

Lazada product page: CM338


Specifications & features
• Bluetooth Chip: PixArt PAU1603
• Supported Decoding Mode: SBC/AAC
• Operating Distance: Up to 10m
• Touch Control
• Bluetooth 5.0
• Sweatproof
• Frequency: 20-20000Hz
• Battery Capacity: Earbuds: 30 mAh; Charging case: 480 mAh
• Charging Time: Earbud: 60 mins; Charging case: 2 hours
• Play Time: Earbud: up to 3 hours; Charging case: up to 18 hours


The box
[attachmentid=10379883] [attachmentid=10379884]
[attachmentid=10379885] [attachmentid=10379886]


Open box
[attachmentid=10379887]


Contents
[attachmentid=10379888]
• CM338 with charging case
• 3 pairs of ear tips (S, M, L)
• Micro USB charging cable
• User manual


CM338 with charging case
[attachmentid=10379889] [attachmentid=10379890]
[attachmentid=10379892] [attachmentid=10379894]
[attachmentid=10379895] [attachmentid=10379896]
[attachmentid=10379897] [attachmentid=10379898]
[attachmentid=10379899] [attachmentid=10379900]


Ear tips
[attachmentid=10379901] [attachmentid=10379902]


Micro USB charging cable
[attachmentid=10379903] [attachmentid=10379904]


User manual
[attachmentid=10379905] [attachmentid=10379906]
[attachmentid=10379907] [attachmentid=10379908]
[attachmentid=10379909] [attachmentid=10379910]
[attachmentid=10379911] [attachmentid=10379913]
[attachmentid=10379914] [attachmentid=10379915]
[attachmentid=10379916] [attachmentid=10379917]
[attachmentid=10379918] [attachmentid=10379919]


Testing
[attachmentid=10379920] [attachmentid=10379921]


Final thoughts
The CM338 is simply excellent. The build quality of it is good. The glossy black finish is a fingerprint magnet.

The bass is just nice but not too heavy. The lows and mids are great.

Tested gaming with COD Mobile and PUBG Mobile with minimal lag.

MSI MPG X570 Gaming Plus,

$
0
0
A very short review for this motherboard, I bought this motherboard back in July when 3rd gen Ryzen is released, it was the cheapest X570 motherboard back then.

Pros:
- Very good aesthetics with black/red colour scheme
- Good RGB lighting support, able to sync with HyperX Predator RAM
- Silent chipset fan
- Easy to use BIOS
- Timely BIOS updates, greatly improving performance, boot time, etc. (except the AGESA ABB updates which is almost 1 month later than others)
- Everything working as expected

Cons:
- Meh VRM temperature

user posted image

D-Link DIR-2660 Wi-Fi Router + DRA-2060 Extender, Budget, Fast & Whole-Home ...

$
0
0
Author's Note: The original review can be found at my blog - D-Link DIR-2660 Wi-Fi Router + DRA-2060 Extender Review @ JayceOoi.com.

Say hello to this budget yet performing AC2600 Smart Mesh Wi-Fi Router – D-Link DIR-2660. It is loaded with a powerful 880 MHz dual-core processor. Able to pair with D-Link DRA Mesh Extender series for whole-home mesh Wi-Fi coverage. Built-in McAfee Protection to defend yourself at the network level way before threats come close. How does it perform? Let’s find out….

[YOUTUBE]xCFqppaZVjg[/YOUTUBE]

Ugreen BT5.0 TWS Earphones (CM338), Real World Usage...Music & Calls.

$
0
0
Hey all, this thread will be about Ugreen's premiere True Wireless Stereo (TWS) earphones, model no. CM338. AFAIK, they initially debuted in Malaysia as a promotional item during the previous 11.11 sales on Lazada (possibly on Shopee too). Given typical Ugreen products, this too appears to be met with decent expectations & acceptance. In my typical fashion, this review is a real world review, having used the device as a daily driver for about 3 weeks. So let's get on with it....

Some customary official images to whet your appetite;
[attachmentid=10384721] [attachmentid=10384722]

[attachmentid=10384720]

Box & Actual Hardware
» Click to show Spoiler - click again to hide... «

Yup, it does look nice and all. Moving on to things I consider pros and others cons. Though I'll have to agree that some cons are more of me nitpicking than actual deal-breakers. But hey, these cost around RM100...So bear in mind, this isn't marketed or even priced as a luxury product or audiophile level. There's that. .. on with it then.

PROS
*Pairing is easy enough as with most TWS earbuds. You take them out of the case and both immediately enter pairing or connecting mode. The latter happens when a previously paired device is on and ready to connect.
*Each box ships with 3 different earplug sizes.. Small, Medium & Large. Obviously they aren't independently labeled, but you can tell the differences by looking at them. I encourage you try a couple out and see which fits you the most.
*With a single earphone battery capacity of 30mAh. Playback lasts around 4 hours. Charging using the case takes about an hour from depletion to full again.
*Charging the depleted case (480mAh) itself takes about 2 hours. The fully charged case is capable of recharging the earbuds 4 times (both earphones used), and 9 times if it's just one being used the whole time.
*Case is small and slick enough to fit comfortably in most pockets and for some, without showing any bulge. The roundness and smoothness helps tremendously here. As it can move around without getting stuck in a cerain position, say fighting with keychains, etc.
*Case's build quality is solid when closed. Though it doesn't come without its demerits. See cons below.
*Box states its for Android & iOS, however it does work on Windows PCs. Test carried out with a Windows 10 PC, earbuds and mic work as intended.
*In-built Microphone on both earbuds. However, only one side works at a time. Usually the earbud that's brought out first. I didn't notice it until I was testing it via windows PC. Cuz you can see the bars on the screen moving in relation to input strength. Not much of an issue per se, but worth pointing out. So if you (like me) typically brings out the right earbud first, then expect that mic to be the functioning one. I would guess this to be a battery saving "feature" as opposed to a technical limitation.
*The following modes are supported when connected to a mobile phone (Primary test-bed: Android);
...Phone Calls
...Media Audio
...HD Audio:AAC
...Contact Sharing
*Voice assistant wake-up works.
*Android Smart lock is supported. This may or may not be a blessing to you. Sure, it makes it easier to unlock your device.. On the negative side, all a robber has to do is walk away with both your buds and the phone. Not so great now is it.. tongue.gif So, I'd say be careful which devices and or locations you enable this feature with..
*Voice prompts (English Only) are present to affirm various statuses, such as;
...Source Connected/Disconnected
...Single earbud connections
...Pairing mode activation
...Power On/Off
...Left/Right Channel connected
...You have an incoming call.
..."Reject" for when an incoming call is rejected from the earbuds.
..."Over" for when a call is ended from the earbuds.
*Touch button commands are included..The basics are all there, though I feel it could have been more intuitive. Currently, it operates as follows;
...Answer/End calls: Double tap on either earbud.
...Reject an incoming call: Long press the touch button for 2 seconds.
...Play/Pause: Double tap on either earbud.
...Previous song: Long press the touch button on the Left earbud.
...Next song: Long press the touch button on the Right earbud.
...Activate Voice Assistant: Ensure you are connected to the device and in a standby state. Tap three times on either bud to call up Siri or the Voice Assistant (Not just Google's) on some Android phones. "Some" is used as not all Android devices have proper functioning Voice Assistants.

CONS
*Can only be connected to a single source at a time.
*Sweat-proof, not waterproof.
*Magnetism between the earbuds and the case should be stronger, for a slightly more convenient storage.
*In-built mic is poor when out in public...Tried using it on the street and in malls. Same experience...Worse off than others as it only utilizes one of the 2 available mics at a time..other party had difficulty hearing me. Works alright in closed-off reasonably quiet environments though (i.e home, car, etc). So I advise to only rely on it at such places.
*No volume increase/decrease touch button commands. IMO, for a truly wireless experience and comfort, I would like to not have to always reach for the audio source's volume controls every time.
*No ANC... Not really a con at this price point. But for those interested.. There is some noise canceling effect cuz after-all, it's still an in-ear earphone. Unfortunately it's not so ideal, as I can still hear typing sounds from my regular non-mechanical keyboard, on a desk in front of me.
*No Qualcomm® aptX™ HD Audio support. As such there's only a barely noticeable lag. It would be nice to have that in the next revision. Higher resolution audio & significantly reduced latency.
*Both earbuds are marked "L" for left & "R" for the right side. However, they aren't exactly legible to read and both shapes are identical. Meaning that unless systematically removed from one's ears and straight into their respective slots, either of the buds will fit in the other's slot. Causing slight confusion when blindly taken out and re-inserted back into one's ears and playing audio with distinct left and right channel signals.
*To put it simply...I dislike the case's material. TBH, Glossy black plastic shines when clean & new and is great for photo-shoots, etc. But practicality-wise, it's a wrong choice for anything that requires constant touching and usage. Smudges, fingerprints, dust, etc.. It attracts & retains them all. Particularly with the shape of the case. Our palms tend to get wet and or oily, making one-handed fish, grip and flip open motions, harder than they should be. On more than one occasion, I found myself making multiple attempts to open it up in a fluid motion. Most times, I just give up and use both hands. On the up side, cleaning is easy. Just a simple wipe or 2 and we shiny again.
*Lastly, there's a weak point with the case's hinges (at least with my unit). Opening or once opened, they feel weak and wobbly. I feel there should be more tightness to them to offer us a sense of increased durability. Thankfully there are magnets to help snap the case shut. But it was the first thing that concerned me after unboxing the device.

Conclusion
All in all...Let's forgo the cons and nitpicking.. They fit nice and snug. Won't fall off during mild activities and the bass is (dare i say) just about right...Nothing too heavy or too light. The Mids are okay and the Highs are quite good. Best thing about using them is speech clarity. Using them to listen to audio podcasts (talking) makes for a truly enjoyable experience. I find that I don't have to crank the volume level too high, in order to clearly hear the proverbial pin drops. Easily maintains connection with the source 30ft+ away in the same room. Put the usual obstacles between it and as expected audio drop-outs occur. So I'd say the earphones performed okay. They are from Ugreen and having used a couple of their products as daily drivers. I can attest to their durability and reliability. Though seeing as this is an entirely new category for them, time will tell how well-built these particular model is. Nonetheless, I've got high hopes for it.

Many thanks to Ugreen for providing this unit and allowing me to review objectively. Feel free to get units from their official stores below;

Lazada Store
Shopee Store
Aliexpress Store
Official Ugreen Website

[YOUTUBE]3sGKHUIsAa4[/YOUTUBE]

Gaming Laptop - RM5k, Buy a gaming laptop with budget of RM5k

$
0
0
Recently intend to buy a gaming laptop with a budget about RM5k

And i need all the experts' recommedation for the best value laptop for this price. *any brands

240GB Transcend ESD240C, Excellent transfer rate!

$
0
0
Author's Note: The original review can be found at my blog - 240GB Transcend ESD240C Review @ JayceOoi.com.

Introduction
Fast transfer rate up to 520 MB/s. Ultra-portable with a sturdy metallic case. Yes, my wife loves her useful yet stylish 240GB Transcend ESD240C Portable SSD. Great for desktop PC, laptop and on-the-go mobile device. ESD240C makes her life easier thanks to advanced Transcend Elite for fast data backup and restore. Does it really that great? Read on to find out...

Special Thanks
This review is possible thanks to below companies. Be sure to check them out too...
  • Transcend for this 240GB Transcend ESD240C Portable SSD

user posted image

Package Content & Design
As usual, 240GB Transcend ESD240C comes well-protected just like other Transcend's products. Once taken out ESD240C, you can find 2 cables – USB Type C to USB Type A & USB Type C to USB Type C, quick start guide and Transcend product brochures in the package.

user posted image

Build quality is outstanding thanks to sturdy metallic case in a silver hue. Loaded with lightweight aluminum construction and optimum shock-resistant qualities. Yes, it is ultra-portable and durable no doubt.

user posted image

There are 3 capacities to choose - 120GB TS120GESD240C, 240GB TS240GESD240C and 480GB TS480GESD240C. Just pick the one that suits your needs.

user posted image

Love the latest USB 3.1 Gen 2 Type-C port. Suitable for all the latest devices in the market. And that tiny hole is LED light indicator by the way.

user posted image

Software
You don't need any software in order to use ESD240C. However, Transcend Elite will provide you a lot of useful functions like instant backups and scheduled backups. Restore from any point on the backup task list. Protect files with powerful 256-bit AES encryption. It is compatible with macOS, Windows OS and Android.

user posted image

You can even lock the SSD drive with password. Only you can access those files then. Isn't that great?

user posted image

Mini0906 Pro, The upgraded Mini0906

$
0
0
Author's Note: The full review can be found here. My review blog for my other reviews: jwtechreviews.com

[attachmentid=10386940]

Thanks to MEGTech for sending over their latest Mini0906 Pro dual dashcam for review. Please do take note that this is a beta sample before production.

Official product page: Mini0906 Pro


Technical Specs:
• Novatek NT96663
• Sensor for the front using Sony Exmor IMX327 and for the rear using Sony Exmor IMX291
• Viewing angle for front: 135° wide-angle 7G lens F1.8 aperture; for rear 155° wide-angle 6G lens F2.0 aperture
• 1.5″ TFT LCD
• Resolution: front & rear 1080p 30fps & 1080px720p 30fps; front only 1080 60fps, 1080p 30fps & 720p 60fps
• Support up to 256GB microSD card
• Built-in GPS
• Built-in supercapacitor
• Built-in WiFi 802.11 b/g/n
• CPL filter (optional)
• Upside down mounting
• Remote for file protection or take photo
• Parking mode (requires a hardwire kit)


The box
[attachmentid=10386947] [attachmentid=10386948]
[attachmentid=10386949] [attachmentid=10386950]
[attachmentid=10386951]


Open box
[attachmentid=10386952] [attachmentid=10386953]
[attachmentid=10386955]


Contents
[attachmentid=10386959]
• Mini0906 Pro
• GPS mount
• 2° & 4° angle mounting wedge & mounting screws
• Rear camera
• Rear camera cable
• Car charger with USB port
• Remote with mounting tape
• Mounting tapes
• Cable holders x6
• Micro USB cable
• Nylon string
• Microfiber cloth
• User guide


Mini0906 Pro
[attachmentid=10386963] [attachmentid=10386964]
[attachmentid=10386965] [attachmentid=10386966]
[attachmentid=10386967] [attachmentid=10386968]


GPS mount
[attachmentid=10386969] [attachmentid=10386970]
[attachmentid=10386975] [attachmentid=10386981]
[attachmentid=10386985] [attachmentid=10386986]
[attachmentid=10386987] [attachmentid=10386988]


2° & 4° angle mounting wedge & mounting screws
[attachmentid=10386989] [attachmentid=10386990]
[attachmentid=10386991] [attachmentid=10386998]


Rear camera and cable
[attachmentid=10386999] [attachmentid=10387000]
[attachmentid=10387001] [attachmentid=10387006]
[attachmentid=10387008] [attachmentid=10387010]
[attachmentid=10387012] [attachmentid=10387013]
[attachmentid=10387014]


Car charger with USB port
[attachmentid=10387015] [attachmentid=10387016]
[attachmentid=10387017]


Remote with mounting tape
[attachmentid=10387018] [attachmentid=10387019]
[attachmentid=10387021] [attachmentid=10387024]


Mounting tapes and cable holders
[attachmentid=10387027] [attachmentid=10387029]
[attachmentid=10387030]


Micro USB cable
[attachmentid=10387031] [attachmentid=10387034]


Nylon string and microfiber cloth
[attachmentid=10387035] [attachmentid=10387036]


User guide
[attachmentid=10387038] [attachmentid=10387040]
[attachmentid=10387041] [attachmentid=10387042]
[attachmentid=10387045] [attachmentid=10387046]
[attachmentid=10387047] [attachmentid=10387048]
[attachmentid=10387049] [attachmentid=10387050]
[attachmentid=10387051] [attachmentid=10387052]


Initial firmware out of the box
[attachmentid=10387054]


Test setup
[attachmentid=10387055] [attachmentid=10387056]
Using a 128GB Samsung Evo Plus for the recordings


Road Cam app
[attachmentid=10387057] [attachmentid=10387058]
[attachmentid=10387059] [attachmentid=10387060]
[attachmentid=10387061] [attachmentid=10387062]
[attachmentid=10387063] [attachmentid=10387064]
[attachmentid=10387065] [attachmentid=10387066]
[attachmentid=10387067]


Videos
The front camera recorded in 1920×1080 30fps with an overall bit rate of 20.3 Mb/s.
[YOUTUBE]RAwoXYizlG8[/YOUTUBE]

[YOUTUBE]qw4_fZK5z3o[/YOUTUBE]

[YOUTUBE]7Ngfq0Gga00[/YOUTUBE]

[YOUTUBE]2d_rQ13tmp0[/YOUTUBE]

[YOUTUBE]ZE8qOpbzcVM[/YOUTUBE]

[YOUTUBE]A_6X-NFv6Vs[/YOUTUBE]


The rear camera recorded in 1920×1080 30fps with an overall bit rate of 16.6 Mb/s.
[YOUTUBE]56ya2mF3rPk[/YOUTUBE]

[YOUTUBE]jGJUjeseDWA[/YOUTUBE]

[YOUTUBE]ollWESsfnU0[/YOUTUBE]

[YOUTUBE]Hr2JfFu4Rgs[/YOUTUBE]

[YOUTUBE]tE_tMPXxBFw[/YOUTUBE]

[YOUTUBE]HRI-2qcxFbc[/YOUTUBE]


Final thoughts
This Mini0906 Pro is an upgraded version of the original Mini0906 with newer Sony Exmor R sensors for both front and rear cams. The recording is definitely improved from the previous Mini0906.

It now also includes a built-in wi-fi so you can use Road Cam app to connect to the Mini0906 Pro

The Road Cam app is very easy to use to stream/download the videos via wi-fi. But can’t be used to configure the settings in the Mini0906 Pro.

Do take note that this Mini0906 Pro is a beta sample before production as my unit has an issue of the date and time reset to Jan 1, 2000, every time after shutting down. But lucky the date and time will sync after the GPS gets connected to the satellites.

AORUS 17 Ultimate Gaming Laptop, Mech. Keyboard & Ultrathin Bezel Display

$
0
0
Recent 2 years GIGABYTE launched many Mid-High level laptop, want to gain more market share.
Now the hottest series are Gaming and Creator market
The AERO series for Creator market, designed with 15” and 17”, with many HW combination models.
AORUS is for Gaming series, mainly with 15” and 17” design.
This time we got GIGABYTE AORUS 17, the brand new design with highest SPECs.
user posted image

Many brand like DELL, ASUS, MSI, they all separate Gaming notebook with 2 categories.
One is slim type with mid-high level Hardware, another is larger muscle notebook with highest Hardware SPECs.
AOTUS 17 is the 2nd type muscle book, but with thin bezel and slimmer chassis.
It’s kind of combination of both advantage of slim and strong power.
A side metallic chassis, with AORUS eagle Logo and dual lines to create speedy style.
The backside extend part is small, center stripe and both side airflow exhaust comes with LED light bars.
user posted image

Dimension of this 17” NB is 396(W)x 293(D)x 38(H)mm, weight about 3.75kg
Actual weight is 3780g, compare its solid chassis and top level hardware, the size, thickness and weight all smaller than the previous review of Dell Alienware Area-51m.
user posted image

B side and C side chassis design
AORUS 17 comes with 3 version of WA, XA and YA, YA is the top level.
It depends on CPU, Display and GPU combinations difference.
This article is TA version, comes with Intel Core i9-9980HK and GeForce RTX 2080
user posted image

The C side 17.3” display, YA version with AUO FHD display.
Refresh rate is 240Hz, 3ms response time, match the top gaming display format.
Each notebook display passed the color calibration of X-Rite™ Pantone from factory.
Delta E <1 is very close to original color display, it helps a lot for many user environment.
3mm ultrathin bezel design, very rare design even on other ultrathin notebooks.
The HD resolution on the bottom side, the dark noise is higher, but still very smooth.
user posted image

C side material is most important for user, because it will touch by fingers and palm rest.
The touchpad is very sensitive with high level NB quality, left & right holes for speakers.
Left down side showed “Made in Taiwan”, right down side is feature label.
user posted image

AORUS eagle image power bottom, showed white light when boot up.
Back left and right side of vents design with style shape, comes with straight line colorful light for gaming style.
In front of C side with 2 zones light control, support RGB Fusion 2.0
Keyboard is the most special design, high light as world’s 1st OMRON switch slim mechanical keyboard.
Key Switch cap is round design, to make the LED light more balance, the light is more beautiful.
user posted image

The key press up to 15Millions times lifecycle, 2.5mm slim key distance.
The 1.6mm trigger point is better than other top-level laptops of membrane keyboard.
Compared with Cherry keyboard switch still have some difference on feedback and click sound, that depends on personal preference.
According to my 10 years experience of Cherry switch keyboards, use OMRON switch keyboard shall not have big difference.
This design make the 17” muscle design of top level gaming notebook could be slimmer.
user posted image

The right side
From left side, USB3.1 Gen1(Type-C) / UHS-II SD Card Reader
2x USB3.1 G1(Type-A)/ chassis vents.
user posted image

The left side
From left, vents, / DP 1.4 & USB3.1 (Type-C)
Thunderbolt3(Type-C) / USB3.1 Gen1(Type-A)
Microphone jack / Headphone jack (Support Hi-Res Audio and SPDIF)
user posted image

Ugreen TWS Earbuds, V-shape sound, AAC, Bluetooth 5.0

$
0
0
Author's Note: The original review can be found at my blog - Ugreen TWS Earbuds Review @ JayceOoi.com.

Hey guys, check out my latest True Wireless Bluetooth Earbuds CM338 by Ugreen. It is loaded with Bluetooth 5.0, touch control, auto pairing, HiFi stereo, 18 hours playtime and mini in size. Budget yet performing? Let’s find out together...

[YOUTUBE]d9YORaSsUpw[/YOUTUBE]

Thanks for watching...

Tronsmart Onyx Neo, Spunky Beat's affordable twin

$
0
0
Author's Note: The full review can be found here. My review blog for my other reviews: jwtechreviews.com

[attachmentid=10392311]

Thanks to Tronsmart for providing the Onyx Neo for review.

Where to buy link: here


Specifications & features
• Chip: Qualcomm QCC3020, supports aptX, AAC, SBC
• Qualcomm DSP & cVc 8.0
• USB Type-C Charging
• One-Tap Control Voice Assistant
• Bluetooth 5.0
• IPX5 Water-Resistant
• Bluetooth Compatibility: HFP/HSP/AVRCP/A2DP
• Impedance: 16Ω
• Speaker: Φ6mm
• Frequency: 20-20K Hz
• Battery Capacity: Earbuds: 35 mAh; Charging case: 350 mAh
• Charging Time: Earbud: 50 mins; Charging case: 2 hours
• Play Time: Earbud: up to 7 hours (50% volume); Charging case: up to 24 hours (50% volume)
• Standby Time: With charging case: 90 days
• Driver Unit: Φ6mm


The box
[attachmentid=10392313] [attachmentid=10392317]
[attachmentid=10392321] [attachmentid=10392325]


Open box
[attachmentid=10392326] [attachmentid=10392327]


Contents
[attachmentid=10392328]
• Onyx Neo with charging case
• 3 pairs of ear tips (S, M, L)
• USB Type C charging cable
• User manual
• Warranty card


Onyx Neo with charging case
[attachmentid=10392329] [attachmentid=10392330]
[attachmentid=10392331] [attachmentid=10392332]
[attachmentid=10392333] [attachmentid=10392334]
[attachmentid=10392337] [attachmentid=10392341]
[attachmentid=10392346] [attachmentid=10392348]
[attachmentid=10392349]


Ear tips
[attachmentid=10392350]


USB Type C charging cable
[attachmentid=10392351] [attachmentid=10392352]


User manual
[attachmentid=10392353] [attachmentid=10392354]
[attachmentid=10392355] [attachmentid=10392357]
[attachmentid=10392361] [attachmentid=10392366]
[attachmentid=10392367]
In 6 languages – English, Italian, Spanish, Dutch, French & Japanese


Warranty card
[attachmentid=10392368] [attachmentid=10392369]


Charging
[attachmentid=10392370] [attachmentid=10392371]


Testing
[attachmentid=10392372] [attachmentid=10392373]
[attachmentid=10392374]


Final thoughts
This Onyx Neo is the twin brother of Spunky Beat with identical specs.

Onyx Neo is missing the USB-A cable for 2nd method of charging and the built-in strap which Spunky Beat has.

[attachmentid=10392385] [attachmentid=10392387] [attachmentid=10392389]

Noticed on Onyx Neo there are some slight improvements; low frequencies are more detailed and brighter. The bass is more textured and good dynamics. Mid and high frequencies remain the same like on Spunky Beat.

The price of Onyx Neo is lower than Spunky Beat with the same specs but with some slight improvements. Making it the most affordable TWS using a Qualcomm chip.

Acumen XR10, Digital Rearview Mirror Dual Dashcam

$
0
0
Author's Note: The full review can be found here. My review blog for my other reviews: jwtechreviews.com

[attachmentid=10392496]

Thanks to Acumen for sending over their latest Acumen XR10 digital rearview mirror dashcam for review.


Technical Specs:
• Processor: Mstar8339D
• Sensor: Smartsens SC2363
• Viewing angle for front: 140° wide-angle lens F1.9 aperture; for rear 100° wide-angle lens F1.9 aperture
• 9.66″ IPS 1289×320 touch screen
• Resolution: front & rear 1080p 30fps
• Built-in 500mAh lithium-ion battery
• Reverse camera (require wire tapping)
• GPS module (optional)
• ADAS (FCWS & LDWS)
• Parking mode


The box
[attachmentid=10392501] [attachmentid=10392502]
[attachmentid=10392504] [attachmentid=10392505]
[attachmentid=10392506] [attachmentid=10392507]


Open box
[attachmentid=10392508] [attachmentid=10392509]


Contents
[attachmentid=10392510]
• XR10
• Rear camera
• Rear camera cable
• Rear camera mounting tape and screws
• Car charger
• 16GB micro SD card
• Micro SD card reader
• Silicon mounting straps
• Pry tool
• Wire tap
• Cable holders x5
• Microfiber cloth
• User guide


XR10
[attachmentid=10392513] [attachmentid=10392515]
[attachmentid=10392522] [attachmentid=10392528]
[attachmentid=10392532] [attachmentid=10392534]
[attachmentid=10392536]


Rear camera
[attachmentid=10392537] [attachmentid=10392538]
[attachmentid=10392539] [attachmentid=10392540]
[attachmentid=10392541]


Rear camera cable
[attachmentid=10392542] [attachmentid=10392543]
[attachmentid=10392544] [attachmentid=10392545]


Rear camera mounting tape and screws
[attachmentid=10392546] [attachmentid=10392547]


Car charger
[attachmentid=10392548] [attachmentid=10392549]


16GB micro SD card
[attachmentid=10392550] [attachmentid=10392551]
[attachmentid=10392552]


Micro SD card reader
[attachmentid=10392553] [attachmentid=10392554]
[attachmentid=10392555]


Silicon mounting straps
[attachmentid=10392556]


Pry tool
[attachmentid=10392557] [attachmentid=10392558]


Wire tap
[attachmentid=10392559] [attachmentid=10392560]


Cable holders
[attachmentid=10392561] [attachmentid=10392562]


Microfiber cloth
[attachmentid=10392563]


User guide
[attachmentid=10392564] [attachmentid=10392565]
[attachmentid=10392566] [attachmentid=10392567]
More pictures of the full user guide here.


Initial firmware out of the box
[attachmentid=10392568]


Test setup
[attachmentid=10392569] [attachmentid=10392570]
Using a 64GB Netac Pro micro SD for the recordings


XR10 interface
[YOUTUBE]BU0aFvPM7hE[/YOUTUBE]


Videos
The front camera recorded in 1920×1080 30fps with an overall bit rate of 12.3 Mb/s.
[YOUTUBE]KC-bW3Dowig[/YOUTUBE]

[YOUTUBE]GNhBnGnx7Uw[/YOUTUBE]

[YOUTUBE]BtX7fsuF21M[/YOUTUBE]

[YOUTUBE]lMYY9nHtIF8[/YOUTUBE]


The rear camera recorded in 1920×1080 25fps with an overall bit rate of 12.4 Mb/s.
[YOUTUBE]U9evhxGiSUg[/YOUTUBE]

[YOUTUBE]s-zi1cam14I[/YOUTUBE]

[YOUTUBE]DlerGWi8yGg[/YOUTUBE]

[YOUTUBE]mwKSvJgOSGM[/YOUTUBE]


Final thoughts
The XR10 is a really cool digital rearview mirror with a dashcam and reverse camera function.

Didn’t test out the reverse camera function as a need to wire tap to the reverse light to engage the reverse camera function. The rear camera is waterproof so you can mount it at the rear of the car.

The first time I liked a rearview mirror dashcam for its digital rearview mirror feature but I still don’t like the front camera lens is at the far left as here is right-hand drive.

Tronsmart Onyx Neo, Sound as great as Spunky Beat?

$
0
0
Author's Note: The original review can be found at my blog - Tronsmart Onyx Neo Review @ JayceOoi.com.

Introduction
Powered by Qualcomm QCC3020 that supports aptX and AAC studio quality lossless audio on top of the usual SBC. Loaded with DSP and cVc 8.0 technologies for clearer hands-free calls with a minimum of ambient noise. Up to 24 hours of playtime with charging case. Yes, that's all part of the latest Tronsmart Onyx Neo Wireless Bluetooth Earbuds. Lookalike Spunky Beat too. Does it sound great as well? Let's find out together...

Special Thanks
This review is possible thanks to below companies. Be sure to check them out...user posted image

Package Content & Design
Onyx Neo comes well-protected just like other Tronsmart's products. There are earphones, charging case, 2 pairs of silicon eartips (S & L), USB-C charging cable, warranty card and multiple languages user manual in the package.

user posted image

Onyx Neo is getting same build quality as Spunky Beat == decent with sturdy plastic housing. Glossy outside and matte inside. Ultra-compact and light in weight too. There are touch-able multi-function button, round LED light indicator and microphone on top of it.

user posted image

And here are the included eartips. As usual, just pick the one that matches you.

user posted image

A compact charging plastic case that eases to carry around. But it does not have built-in USB-A cable this round.

Fit, Comfort & Isolation
Neo has the same outlook as Beat. It has round and smooth body too. Therefore, it is comfortable to wear it for long hour. As usual, pick the correct ear tips size that matches you. Getting perfect seal with M size on Neo as expected. And it stays securely while exercising and jogging. No worry about dropping it at all since it’s so light. Don't forget the IPX5 splash-proof that works well against sweat, splashes and rain. Again, it has great noise isolation. It will block some of the environment noises while music is being playback.

user posted image

Performance Result
Yes... Yes... Yes... The Bluetooth range performance is excellent as well. Neo can go up to 7m+ with obstacles like walls. Connection is very stable too. Again, AAC and aptX audio codecs are supported and have lower latency than the usual SBC codec. Therefore, audio and video are virtually in-sync that great for movie, games and MV. Lastly, you can use Neo as stereo or mono as you wish.

user posted image

Based on specs, you can enjoy up to 7 hours of music playback. Up to 24 hours of listening with the charging case. More than enough for your daily sport activities. And there is battery indicator status on iOS and Android devices. Never forget to charge it when low power.

Great phone call experience. Again thanks to Qualcomm’s cVc 8.0 Microphone Noise Cancelling that suppresses noise during a call and reduce echo feedback. Others can hear me loud and clear.

user posted image

Sound Quality
Onyx Neo performs the same as Spunky Beat so far. Why does Tronsmart come out Neo then? You might ask. Both of them have different sound signature. Neo is balanced toward bright this round. Highs are crisp and clear. Basically, it is the best part of Neo and focuses on. As for mids, vocals sound nice in both male and female. Bass is there and decent in performance. But don't expect boom boom kind of bass like Beat. Soundstage performance retains the same - good for the price. Instruments placement separation is clear even in the complex scene.

user posted image

Advantages
  • Crisp & clear treble
  • aptX and AAC support
  • Wide Bluetooth range
  • Excellent microphone
  • Long battery life
  • Comfortable for long hour wear
  • IPX5 splash-proof
Limitations
  • For the price, nope
Conclusion
Love clear and crisp treble? You don't want to miss out Tronsmart Onyx Neo then. Great sound for the price. Period. Love extra bass? Look for Spunky Beat then.

UGREEN Premium 7-in-1 USB-C Hub, USB-C Multifunctional Adapter

$
0
0
Hi all and welcome once again to another real world usage review. This time I'll be reviewing the Premium 7-in-1 USB-C Hub from Ugreen. Such hubs and adapters are proving quite handy these days. Nay, they are proving indispensable. With "older" devices, majority of us had to plug in one device at a time per adapter. Meaning if you needed an extra USB or VGA or HDMI or Ethernet ports, etc. One typically had to choose to only use one at a time, depending on how your notebook is specced. Gradually it appears that the days of modern notebooks built with sometime every port imaginable are being phased out. At the very least, this is true for the more premium models being released in the past years (around 2015+) and the ones to come. Examples includes Google Chromebook Pixel 2015, Asus ZenBook 3, the latest MacBook Pro with ships with up to Four separate Thunderbolt 3 (USB-C) ports with support for Charging, DisplayPort, Thunderbolt (up to 40 Gbps) & USB 3.1 Gen 2 (up to 10 Gbps). Most notebooks even ship with just a single port. Such as the soon-to-be released notebook, the Samsung Galaxy Book S. The use case scenarios doesn't end at just notebooks either. Several mobile phones sporting a USB C port are supported too. So investing in a decent and reliable hub/adapter is crucial. Doesn't matter if you are a basic or power user.

[attachmentid=10395572] [attachmentid=10395573]

Specifications
Input: USB-C (Male)
Output:
*1X HDMI port:supports resolutions up to 4Kx2K@30Hz
*2X USB A ports, compliant with USB 3.0 specifications with transfer rates up to 5Gbps, and backwards compatible with USB 2.0/1.1
*1X 10/100/1000 RJ45 Ethernet Port (Basically Gigabit)
*1X USB-C Power port with PD protocol
*1X Microd SD (TF) slot: Support UHS-I (Micro SD, Micro SDHC, Micro SDXC)
*1X SD/MMC card slot: Support UHS-I (SD, SDXC, SDHC, Extreme I III SD, Ultra II SD, MMC, RS-MMC)
*Dimensions: 105x51x18 (LxWxH)mm, Cable length: 15cm
*Wattage: Max 100W
*Weight: 99g
*Color: Space Gray

Box & Actual Hardware
» Click to show Spoiler - click again to hide... «


Screenshots
» Click to show Spoiler - click again to hide... «


The screenshots above show that Samsung DeX is supported as well as typical OTG purposes on non-DeX capable devices. I tested using a Lenovo K5 Pro and the Samsung Galaxy Note 9. Carried out some file transfers and got the below results;

Lenovo K5 Pro
PD Works
USB Storage works
File Transfer works...Tested using a 1.1GB file. File transfer from a USB 2.0 (16GB Toshiba) drive to the phone's internal storage took 1 minute. Moving the same file back took 3 minutes 45 seconds.

Samsung Galaxy Note 9
PD Works
USB Storage works
Samsung DeX works right out of the box.
File Transfer works...Tested using the same 1.1GB file. File transfer from a Samsung USB 3.0 Flash Drive FIT 128GB drive to the phone's internal storage took a blistering 11s....Testament to how fast data can be transferred from decent compatible hardware. Copying the same file to an old spare 2GB microSD card took 2 minutes 30s. While moving the same file from the microSD back to the phone's internal storage took 1 minute 4s.

Thoughts
*The single USB-C female port is only meant for PD charging, and not for data transfer.
*Both USB A ports are for data transfer purposes and not for charging devices. So do NOT attempt using them to charge a phone or tablet.
*The hub supports various MacOS, Windows, & Android devices. It's also compatible with the Google Chromebook Pixel 2015. Please visit their website for the more comprehensive list of verified models. I'll go out on a limb here to mention that the list isn't exhaustive.
*To use the Ethernet feature on MacOS or with Microsoft Windows XP/7? You'll have to manually install the driver. There's an installation disc in the box. Alternatively, head over here to downloadthe necessary drivers. It is recommended to reboot the computer upon successful installation. Windows 8/8.1/10 are plug and play. No driver installation needed.
*Plugging in a Logitech Keyboard+Mouse combo USB adapter into one of the slots, allows compatibility for Samsung DeX usage. Alternatively, to free up that port for data transfer, etc.....One can use a Bluetooth connected Keyboard & Mouse combo. Samsung DeX and it's benefits will be an entirely separate conversation. Naturally, can't be discussed at length in this forum section
The tests above might differ slightly from yours depending on your device and performance of the connected devices. I merely attempted to show how excellent the hub is in varying scenarios with budget & flagship devices. Build quality is impressive. The hub is made out of a stylish space grey aluminum + plastic. This mix also aids in heat dissipation, so one can rest easy during long hours of use. The device does get a bit hot after awhile. But I've been assured by Ugreen that this is perfectly normal and it's safe to carry on. Which I did. biggrin.gif Kudos to Ugreen for excellent fit and finish. Everything simply came together.

Lazada Store
Product page on official website

[YOUTUBE]CIxZu9N2Vqg[/YOUTUBE]

[YOUTUBE]2M-UcV7T43s[/YOUTUBE]

Gigabyte RX 5500 XT Gaming OC 8G,

Beelink BT4 Mini PC (Real World Review), Affordable...Bang for buck general PC.

$
0
0
Hey all and welcome once again to yet another one of my real world reviews. This time I'll be reviewing Beelink's BT4 Mini PC. As of time of writing this review, its selling price is just $USD125 (about RM510). For this low amount, you get a slim Mini PC sporting the Cherry Trail Intel Atom x5-Z8500 CPU, a quad-core 4-thread 1.44 GHz processor capable of being boosted to 2.24 GHz with Intel’s HD Graphics 8Gen GPU. You also get a legitimate Windows 10 Home license, Gigabit Ethernet, not one but 2 HDMI ports (connect 2 monitors and run at up to 4K 30fps) and 4 USB 3.0 ports. Full specifications below;

Specifications
» Click to show Spoiler - click again to hide... «

Cold Boot takes a total of 40 seconds for a fully loaded desktop. 25 seconds from pushing the power button till the welcome screen shows. Shutdown takes about 10 - 15 seconds, depending on actions it has to complete before safely shutting down. All in all, okay times given the specs and price point. The power button (rubber) is located at the back of the unit and is flush, while at the front, a single status led that turns and stays blue to signal when it's plugged in or in sleep mode. Typically, I tend to begin with updating the system as much as possible before commencing usage and tests. I used Intel's own Driver and Support Assistant to update the drivers. Made the process much easier to complete. Plus, the software runs in the background afterwards, monitoring for driver updates, popping a notification when there's one available to install.
Updated Intel drivers
>>>Intel® Graphics Driver for Windows* (Latest version: x.x.x.5107...Installed Version: x.x.x.4424)
>>>Intel® Dual Band Wireless-AC 3165 #2 Windows® 10 Wi-Fi Drivers for Intel® Wireless Adapters (Latest version: 19.51.26.1...Installed Version: 19.51.21.1)
>>>Intel® Wireless Bluetooth® for Windows® 10 (Latest version: 20.100.6.4...Installed Version: 20.100.5.1)

The BT4's outer shell is mostly made out of plastic and rubber. Matte finish (with varying shades & texture) on the top and bottom. Black glossy plastic on the sides and part of the rear. The presence of 4 rubber stubs helps the BT4 to stay in place on a flat surface without sliding. The BT4 employs both active and passive cooling. There's a small fan (which gets a bit noisy when the device gets warmer from being pushed) and vents on the sides and bottom in an attempt to keep things cool.

Box & Actual Hardware
» Click to show Spoiler - click again to hide... «

OOTD & Update Build Information
» Click to show Spoiler - click again to hide... «

Network Speed Test
» Click to show Spoiler - click again to hide... «

CPU-Z
» Click to show Spoiler - click again to hide... «

HWiNFO
» Click to show Spoiler - click again to hide... «

Novabench Report
Online Results
» Click to show Spoiler - click again to hide... «

SSD information and Speed Tests.
» Click to show Spoiler - click again to hide... «

PassMark
» Click to show Spoiler - click again to hide... «

3DMark
» Click to show Spoiler - click again to hide... «

PCMark
» Click to show Spoiler - click again to hide... «

UserBenchmark
Online Results
CPU: Intel Atom x5-Z8500 - 19.1%
GPU: Intel HD Graphics - 1.5%
RAM: Hynix 2x2GB - 24%
MBD: AZW BT4
» Click to show Spoiler - click again to hide... «

Media Playback
Driving a single monitor at default 4K30FPS...This section is where this device truly struggles.

>>YouTube using Chrome. 4K is downright unwatchable, 2K struggles to play smoothly, however one can notice the jerkiness.. 1080p is alright (in windowed mode).. Full-screen? I gave up and switched to Microsoft's Edge browser, hoping at least that should be better at FHD and below resolutions... This was worse, I figured.. If Edge can't save it.. Well, that's it for testing YouTube Playback while driving a 4K monitor at native 4K resolution. I tried switching the display's resolution from 4K to 1080p, but was met with the following notification;
» Click to show Spoiler - click again to hide... «

So I reverted to native 4K once again.

>>Kodi playback...4K H264 jellyfish files are fine, at least up to 160mbps. HEVC files one the other hand struggle to play. Unwatchable, even as low as 60mbps.
» Click to show Spoiler - click again to hide... «

>>Vlc Playback...Similar results as Kodi above.

Conclusion
Major cons includes poor >FHD YouTube playback, I expect this might change for the better is one pairs the BT4 with a single 1080p/2K display instead. This should tax the system less. Then there's the poor cooling. Despite what should be adequate ventilation holes, the inclusion of a tiny fan and heat-sink, all these are simply not enough to counter the amount of heat generated by the device. It's so bad, that even after the PC shuts down, the fan can still be heard spinning trying to rapidly cool the device. This goes on for a couple more seconds before powering off for good. Similar to how some modern car engines keep the radiator fan spinning after the ignition is turned off. It's my first encounter of such a phenomenon. Fortunately the fan's noise is only slightly audible (even in a quiet room) and thus not annoying to listen to. Unlike other Beelink Mini PCs, I've tried and reviewed, The BT4 cannot be expanded with an extra internal drive. So you are stuck with the 64GB drive. You'll have to rely on the cloud and external drives for additional storage, should you require more. Nevertheless, we must remember that this is an affordable Mini PC, nay.. It's a cheap Mini PC. For extremely light gaming and normal office/productivity functions? It absolutely excels. You'll have minimal issue doing those even whilst driving two 4K monitors at their native resolutions. As such, it's a good deal for a beginner or lightly used Home PC and or project.

Detailed System Reports
[attachmentid=10404815]
[attachmentid=10404903]


Official Amazon US Store Purchase URL
Official Aliexpress Store Purchase URL... Cheapest price at the moment.
Additional information on the Beelink BT4 Mini PC...
Beelink official website
Beelink orders

If you want to order machines in bulk or become a Beelink distributor, please contact our foreign trade sales as follow. Discounts and further customized services are available.
Email contact information..

For more information, please pay attention to this space. I'd like to thank Beelink for providing the review unit. As usual, do feel free to comment below should you require further specific information on the Beelink BT4. I'll be glad to assist. smile.gif

WTA - Online marketplace integration tool, Like Selluseller, Sitegiant, KartzHub...

$
0
0
I just wanna ask anyone who has experience with these integration tools.

I have a business which that sells online at Amazon, eBay, Etsy, Lazada, Shopee and etc...

What eCommerce tool is the best with intergration and control in 1 platform (control price, SKU, promotional and etc), in your opinion?

I found tools like Selluseller...Is it any good? Or any recommendation is appreciated. thumbsup.gif

Tronsmart Bluetooth Earphones, Another very average review

$
0
0
I thought I'd give a collective review having used these headphones for some time now instead of the usual reviews whenever new models of Tronsmart headphones come out.

A special shout out to the good people of Tronsmart for the opportunity to have worked together for sponsoring this content.

user posted image
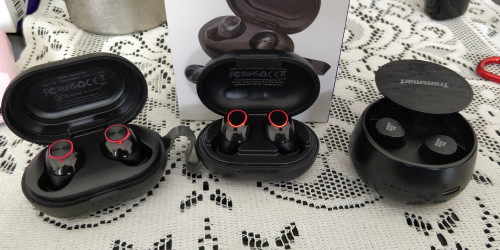
From left - Tronsmart Spunky Beat, Onyx Neo, Spunky Pro

user posted image
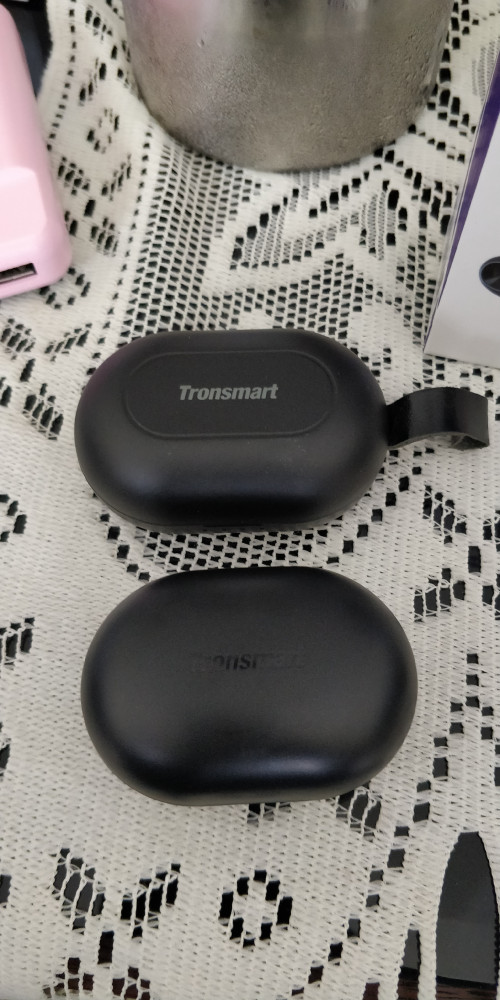
Top to bottom - Tronsmart Spunky Beat vs Onyx Neo. If you're interested in buying the missus a Valentine's gift you wouldn't go wrong with these. They're cute!

user posted image
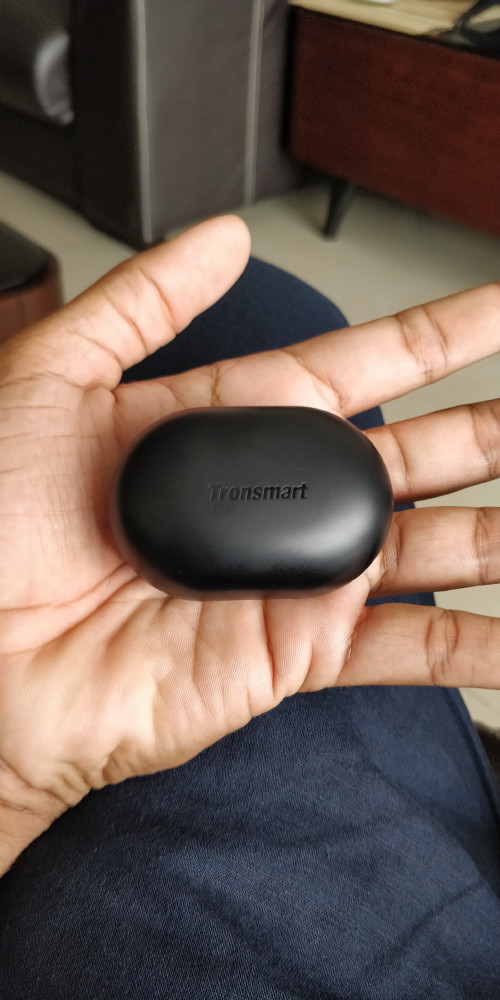
Hand for scale. The Onyx Neo is slightly smaller and fatter than the larger Spunky Beat.

user posted image
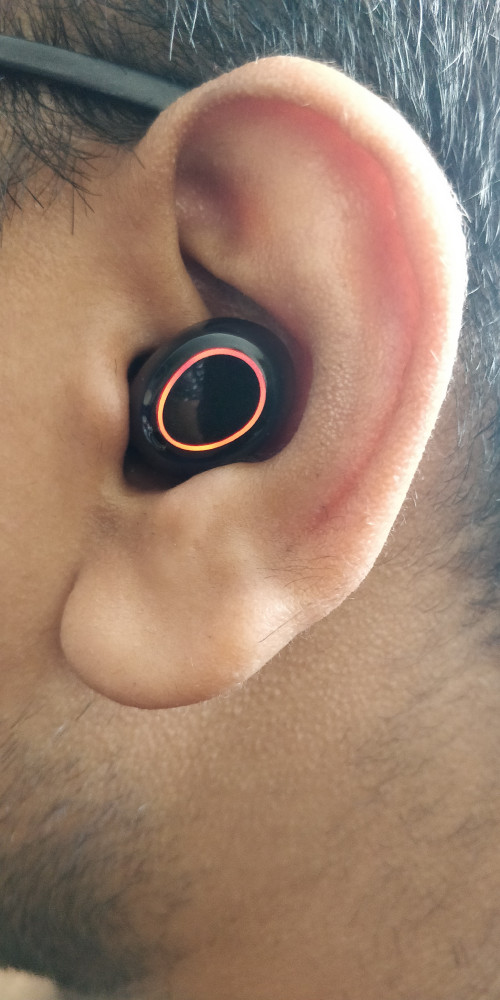
Fitting snugly the latest iteration of Onyx Neo comes with a cool ambient 'halo' light along its edges


Pros
- What I like about Tronsmart products is their tendency to adapt to the latest techs available i.e. Qualcomm aptX, wireless charging (Spunky Pro), Bluetooth 5.0, USB-C charging, IPX5 splashproof
- Progressively their models (Spunky Pro > Spunky Beat > Onyx Neo) has shown improvements in both sound quality and clarity
- Bass feels deeper, treble sounds smoother. What impressed me most of all its durability. I've dropped these headpieces countless and they still look and work like a charm
- Price point, they may not be cheapest in the market but for that extra bit you spend you get what you are paying for

Cons
- Occasionally the Bluetooth headphones disconnect intermittently, apparently quite common in Android due to its power setting feature. So it isn't exactly a con but worth highlighting
- The Spunky Beat version had a volume issue (volume is low even on high setting) but this is sorted out with the Onyx Neo version

I've covered reviews of each headphones previously here and here. For the Onyx Neo fellow Lyn member @blurjoey has a pretty solid review here which you can geek out from.

Head on over to Tronsmart Lazada or Shopee page for upcoming promo offerings during the CNY and Valentine day celebrations

Signing off,
Your very-average reviewer
Viewing all 559 articles
Browse latest View live